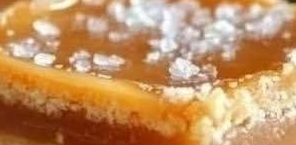
Irresistible Salted Caramel Butter Bars These Salted caramel Butter Bars represent pure decadence—a luxurious indulgent treat featuring a buttery, flaky crust, luscious caramel filling, and perfect sprinkle of sea salt creating an addictive sweet and salty balance. They’re the kind of dessert that stops conversations at parties and has everyone asking for the recipe. Why You’ll Love This RecipeParty favorite – Always the first dessert to disappearPerfect sweet-salty balance – Sea salt elevates the caramel beautifullyImpressive but easy – Looks sophisticated with simple preparationMake-ahead friendly – Actually improves after chillingFeeds a crowd – One pan yield plenty of barsComplete Ingredient List For the Crust and Crumb Topping:4 cups all-purpose flour1-pound salted butter (4 sticks)1¼ cups powdered sugar¾ cup granulated sugar1½ tablespoons vanilla extractFor the Caramel Filling:50-60 pieces caramel candies, unwrapped (14 oz. bag)⅓ cup heavy cream½ tablespoon sea salt½ teaspoon vanilla extractDetailed Step-by-Step InstructionsPreparing the Buttery Crust and ToppingPreheat your oven to 350°F (175°C). Thoroughly grease a 9×13-inch baking dish with butter or nonstick spray to ensure easy removal. In a large mixing bowl, combine the all-purpose flour, powdered sugar, granulated sugar, and vanilla extract. Cut in the butter using a pastry cutter, two knives, or your fingers until the mixture resembles coarse crumbs with some larger pea-sized pieces remaining. This texture ensures a flaky, tender crust. Press half of this crumbly mixture firmly and evenly into the bottom of your prepared baking dish, creating a solid base. Set the remaining mixture aside—this will become your crumb topping.Creating the Luscious caramel FillingIn a microwave-safe bowl, combine the unwrapped caramel candies and heavy cream. Microwave in 30-second intervals, stirring thoroughly between each heating, until the mixture melts completely and becomes smooth and silky. This usually takes 2-3 minutes total, depending on your microwave’s power. Once the caramel mixture is perfectly smooth, stir in the sea salt and vanilla extract. The sea salt adds that irresistible sweet-salty dimension that makes these bars so addictive. Assembling the LayersPour the warm caramel mixture evenly over the pressed crust in the baking dish, spreading it gently to the edges if needed. The caramel will settle into an even layer as it bakes. Sprinkle the reserved crumb mixture evenly over the caramel layer, covering it completely. Don’t press down—the loose crumbs will create a delightfully crunchy topping. Baking to Golden PerfectionPlace the baking dish in your preheated oven and bake for 25-30 minutes, or until the crust and topping turn beautifully golden brown. The caramel may bubble up slightly around the edges—this is perfectly normal. Remove from the oven and let cool in the baking dish on a wire rack for at least 30 minutes. This initial cooling helps the layers set properly. Chilling and CuttingFor best results, refrigerate the bars for at least 2 hours, or until the caramel layer becomes completely set and firm. This chilling period makes cutting clean, neat bars much easier. Once fully chilled and set, cut into squares or rectangles using a sharp knife. For the cleanest cuts, wipe your knife between each slice. Professional Baking TipsButter temperature – Use cold butter for the crumb mixture to achieve proper textureUnwrap efficiently – Freeze caramels briefly to make unwrapping easierEven pressing – Use the bottom of a measuring cup to press crust evenlyDon’t overbake – Remove when golden; overbaking makes the crust too hardPatience with chilling – Full refrigeration time ensures clean cuttingServing SuggestionsServe chilled or at room temperatureDust with additional sea salt flakes before servingPair with vanilla ice cream or whipped creamServe alongside coffee or hot chocolatePackage in gift boxes for homemade presentsStorage and Freshness GuidelinesRoom Temperature: Store in airtight container for up to 2 days in cool weather. Refrigeration: Keep refrigerated in airtight container for up to 1 week. Bring to room temperature for 15 minutes before serving for best texture. Freezing: Wrap individual bars or entire pan tightly in plastic wrap, then aluminum foil. Freeze for up to 3 months. Thaw in refrigerator overnight. Best Served: These bars taste amazing both chilled (for firmer caramel) or at room temperature (for softer, gooier texture). Frequently Asked QuestionsCan I use homemade caramel instead of candy?Absolutely! Use about 1½ cups of prepared caramel sauce. You may need to adjust the cream amount. What if I don’t have salted butter?Use unsalted butter and add ½ teaspoon salt to the crust mixture. Can I make these gluten-free?Yes! Substitute with a 1:1 gluten-free flour blend. The texture may be slightly different but still delicious. Why do I need to refrigerate them?Chilling sets the caramel layer firmly, making the bars much easier to cut cleanly and preventing the
Search Results for: Irresistible Salted Caramel Butter Bars